Getting Started
SFTP is an acronym for Secure File Transfer Protocol. There are various SFTP software packages available that allow you to securely transfer files from one computer to another computer. This is also known as Secure File Sharing. FileZilla is used as the SFTP program; however, Most SFTP Software will be very similar. (FileZilla LSU Overview)
Configure FileZilla SFTP Software for LSU Web Updates:
1. Create a new File or edit an existing File.
2. Save the File. (Save to your desktop, easy to find.)
3. Move the Files to the LSU Web Server using the SFTP Software FileZilla. (Transfer Files With SMTP Software)
Step 1: Log in to the Web Site
1. Start FileZilla.
2. Find the boxes for Host, Username, Password & Port, located under the menu bar.
3. Enter the LSU Settings:
Host Address: upload.lsu.edu
Username: This is your Web Account. (Issued by ITS to the Faculty / Staff Sponsor.)
* Contact the Sponsor if you do not know this information. (Web Accounts start with "www" -- ex. "wwwmyid".)
Password: This is the Web Account Password that was set.
* Contact the Sponsor if you do not know this information. The Sponsor (ONLY) can change this password in the myLSU Portal. (Click Personal Preferences | Password Management)
Port: The port number required to connect is 22.
4. Click the Quickconnect button to log in.

5. Upon Logging In:
a. Text will appear in the box located directly below where you just entered your Web Account information - this is the Console. This window will let you know if your Username and Password were correctly entered.
* You will know that you have correctly entered your Username and Password if you see: Status: Directory Listing Successful

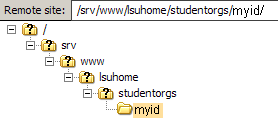
b. A view of the folders on your Web Site will display on the right, located under the area labeled Remote Site. Below in the folder tree, you will see the files & folders located in the folder that you selected.
c. Log into the Web Site Root Folder, which is the lowest level directory that the Web Site has access to. (Similar to a C: drive on a PC.)
Example 1: A file Index.html placed in the root folder would have the following Web address: www.lsu.edu/student_organizations/myid/Index.html
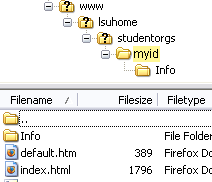
Example 2: A file Page.html placed in a folder Info in the root folder would have the following Web address: www.lsu.edu/student_organizations/myid/Info/Page.html
(of course, instead of student_organizations/myid it would be the URL of your Web site)

A view of the folders on your own computer will appear on the left side, under the area labeled Local Site.

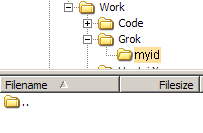
NOTE: The ".." folder that is always at the top of the file list is the "go up a directory" symbol, it is not actually a folder. For example, if you were to go into the folder "Info" and wanted to return to the folder that "Info" is in, the ".." would bring you back there. It works just like the "Up" arrow button in Windows Explorer.
 =
= 
Step 2: Transfer Files and Folders TO & FROM a Web Site
1. Log in to the Web Site.
2. On the Local Site side, navigate to the local folder where you will be keeping the Web Site Files. Make a new folder just for this Web Site, if there isn't already one.
* Files that you transfer from the Remote Site will automatically go into whichever folder you are in on the Local Site.

3. On the Remote Site side, navigate to the files on the Web Site that you wish to transfer to your computer.

4. On the Remote Site side, double-click on the file you wish to transfer. The file will appear on the Local Site side, near the bottom of the window.
5. Under the Successful Transfers tab, there will be a notification on whether the file transfer was successful.

6. To transfer a file back to the Web Site, double-click on the file on the Local Site side. The file will be transferred to whichever folder you are in on the Remote Site side.
NOTE: You can also right-click on a file and select Upload or Download to transfer them.
7. To transfer an entire folder back to the Web Site, right-click on the folder and select Upload or Download to complete the transfer.
* This would create a new folder on the Web Site with the same contents as it had on your computer.
Step 3: Create a Copy of the Web Site on your Computer
WHY CREATE A COPY?
It is a good idea to create a copy of the entire Web Site to your local computer before you begin making changes. With a copy, you have all the files to work with and can see how they relate to each other.
It is VERY important to keep files in their relative positions in the folder hierarchy. If a file is in a certain folder on the server, be sure the file stays in that same folder in your COPY.
1. Create a New Folder on your local computer. (The My Documents folder is a good place.)
2. Log in to the Web Site.
3. On the Local Site side, navigate to the new folder you made (there should be nothing but the '..' in the file view).
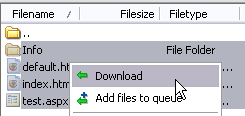
4. On the Remote Site side, single click on any file in the root (such as index.html) and press the key combination Ctrl + A (this will select all files and folders).
5. Confirm that ALL of the files & folders are selected. Right-click on any highlighted files and select Download, located on the menu.

6. Once the transfers are all completed, press F5 to refresh the window so that you can see the copied files.
* It may take a few minutes to download all of the files, however you will be able to watch the progress in the transfer status tabs located near the bottom.
